|
|
|
|

|
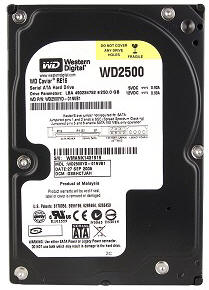
Western Digital SATA Hard Drive |
|
| A few months
ago my primary hard drive in my PC stopped working. It wasn't
the first hard drive that had failed on me, but the others I took to
"experts" to replace and to recover data. I had a back-up drive that
was supposed to be automatic. But the last backup was three
years ago. So much for automatic backup. The warning signs are of impending failure are: having to reboot frequently, your hard drive seems very slow to read or write to, or you occasionally get a boot failure message. It is time to make frequent back-up your data -- somewhere other than the failing hard drive. If you ignore the warnings and don't back up your data, and one day you can't boot your PC at all, then odds are you will have not only have to replace your hard drive after it fails, but you could lose possibly irretrievable and /or irreplaceable data. If your hard drive fails, and you have backed up your data, then the only issue is to find a good replacement drive. It is something you can do yourself, or you can take it to a PC repair shop. If you do it yourself, you'll be the one to load on the Widows operating system, your software, and your data, which is easy if you have the installation CD's, and a backup copy of your data. If your PC came with the operating system pre-loaded, without any CDs to re-install it, then you might have to see your vendor. But this isn't about installing a new hard drive -- it is about recovering data off the failed hard drive if you failed to back it up. The price for professional data recovery has escalated dramatically. Now it costs $400 and up. A company will probably elect to go the professional route. It is more expensive, but also more sure in data recovery. For individuals, and private owners, there is a much more economical route -- Do (most of) It Yourself. This presentation is devoted to what Do (most of) It Yourself entails. The repairs suggested here are not intended to be a return to long-term service. Rather, they are repairs intended to give you enough time to retrieve your data before the hard drive dies permanently. The example presented here is specific to Western Digital SATA drives. There is enough information so that you can also follow links to other hard drive manufacturers. |
|
|
(b) The integrated circuit board is very specific to the production run of the hard drive. If you can't repair it, and it has to be replaced, it must be exactly the same production run as the original board.
(c) There is a special microchip (U12 ROM) chip on the original integrated circuit board that is uniquely specific to that individual hard drive. If you have to replace the integrated circuit board, you will have to remove that chip from the original board and install it in the replacement board. There is no way around this -- it contains the specific instructions for reading and writing to that specific hard drive. |
Figure 1 |
There are two phases to the data recovery process: Phase I - Get the hard drive running again, and Phase II - Recover your Data. PHASE I - Get the Hard Drive Running If your hard drive simply does not spool up (spin) when you turn the power on, then that is actually a good sign that you have a good chance of recovering your data. It means something on the green circuit board of the hard drive failed, and repairing the board, or replacing the board, will likely give you enough resurrected life to recover your data. STEP 1 is to try multiple time to reenergize your hard drive. If you are convinced that isn't going to spool up, then you might as well remove the hard drive from the PC. Mark the cables attached to the hard drive, as you will need them for the replacement drive. DO NOT DISASSEMBLE OR
OPEN THE HARD DRIVE |
Figure 2 |
|
The production run number will look something like this: 2060-701335-003 REV B If you are comfortable doing micro-soldering, and can replace some obviously failed or failing power components, such as capacitors and/or resistors, then you are money way ahead.
|
Figure 3 |
|
More likely you will have to farm that job out . To the right is a link to DonorDrives.com, a firm that can solve that problem for you: You send them your failed hard drive, they diagnose it, and if the circuit board can be repaired, they repair it. If the board needs to be
replaced, they find a replacement board and move your old U12 ROM chip to the
replacement board They are not retrieving your data -- they are repairing the circuit board sufficient for you to spin up the hard drive and retrieve your data yourself. If there are other issues with your hard drive, this may not be sufficient. But it is the first step to try. |
Package: Hard Drive Circuit Board Replacement Part and Adaptation Service
$60.00
Item SKU: S4
[30]
Service Package Includes:
Note: There will be nothing sent to you when you purchase this item! You must send your media to us for service! |
There is another alternative, and that is to buy a replacement board, and move the U12 ROM chip yourself, or find someone to move it for you. To the right is a link to HDDZone.com, an outfit in China that sells boards for $39, including shipping. I used this source successfully. However, it cost me $63 to have the U12 ROM chip moved, so in the long run, it was not the cheapest way to go. |
|
If you are going to move
Figure 4 Figure 5 |
If you are going to move the U12 ROM chip yourself, or have it moved, you need to know which chip it is. In Figure 4, to the far left, the U12 ROM chip is located as shown. However, in Figure 5, to the near left, on a very similar looking board, the U12 ROM chip is located in a different place. The board will have the circuit outline, with "U12" noted on the board where the chip is. You can't see the chip with the board mounted on the hard drive -- ots on the other side of the board. You have to remove the integrated circuit board to see it. |
| PHASE II: RECOVER YOUR
DATA
While all the repairs are going on above, in all likelihood (and highly recommended) you have already replaced the failed hard drive with a new drive. So now, assuming you have your formerly-failed hard drive back, you are ready for some serious data recovery. The first thing, before even turning it on, is to have a plan -- In both Plan A and Plan B, you are booting up on the old drive, which gives you direct access to all the folders and files on the old drive, especially if some files, folders, or user accounts are password protected, and/or you have hidden files you want to transfer. Trying to access such files with the old repaired hard drive connected as a secondary drive often results in access denial, and often you can't even see the file or the file structure, especially if you have enabled passwords for accounts and/or have hidden data files. If, in addition, you have enabled multiple user accounts, the problem is exacerbated. |
PLAN A If you have a back-up drive (a third hard drive, a USB drive, an SD card, or other storage device of adequate size) open it and make a folder called "Old Drive Data" or something like that (your choice). That will be where you put your recovered data.
PLAN B |
| EXTENSION CABLES In Plan A, you will need one SATA extension cable set (power & data). In Plan B, you will need two SATA extension cables sets (power & data), and maybe a SATA to USB conversion kit -- depending on what cable connections are available on your computer. |

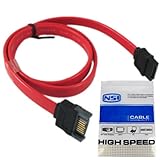 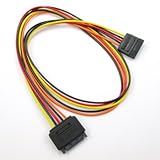
Combined SATA cable set
Separate SATA cable set |
| PLAN A In Plan A, you will boot up on the old repaired hard drive. Since you likely (should) have already installed your new hard drive, and don't want to remove it, the SATA extension cable set allows you to disconnect the new hard drive without removing it, and use the extension cable set to connect the PC up to the old drive. In Plan A the new hard drive is disconnected during the data recovery process. |
Once you have
booted up on the old repaired hard drive, take the following steps: If you have pass-worded User Accounts on the old drive, remove the passwords (Go to User Accounts in the Control Panel, right click on each pass-worded User Account, and select Remove Password). Removing passwords should allow you to access the folders and files, if later you have to go into the old drive as a secondary drive. Make all hidden files visible (In any folder, but especially My Documents, in the menu bar select Tools, then Folder Options, then View, and put a check mark in Make Folders Visible, then click on Apply, then OK.) This makes hidden files visible for transfer, and also makes them visible if later you have to go into the old drive as a secondary drive. If you experience any problems copying folders or files, try moving the folder(s) or file(s) to another location on the old hard drive, such as the root section. |
| PLAN B In Plan B, you will boot up on the old repaired hard drive, just as in Plan A, but in addition you will connect the new drive up as a secondary drive. The first SATA extension cable set is used just as in Plan A, and the second SATA extension cable set is used to connect the new hard drive as a secondary drive. |
|
| PLAN C Plan C is hooking the old repaired hard drive up as a secondary drive. Sometimes you need to do this after Plan A or Plan B to retrieve folders or files you couldn't access or transfer under Plans A or B. |
I had an important hidden
folder on the old drive which just wouldn't show itself under Plans A or
B. I kept trying to change all the folder and file attributes to
unhide all hidden files everywhere. But the system simply wouldn't
show them. I thought maybe it wasn't there. So, otherwise finished transferring folders and files, I shut down the PC, hooked up the new hard drive, connected the old hard drive as a secondary drive, and booted up. Lo and behold -- there on the old hard drive was my formerly hidden folder -- now visible. I transferred it to the recovered data folder, and now my recovery was complete. |
| PLAN D Plan D is for when Plans A, B, or C don't work, or don't work completely, and you still have very valuable data to retrieve. Then you send the old hard drive off to a professional shop. |
Prepare to spend anywhere from $400 to $2,000. |
|
©2013 Simon Revere Mouer III, all rights reserved |
|